GPU的测试(一)
Nvidia自带一个命令行工具可以查看显存的使用情况:
nvidia-smi
如图:
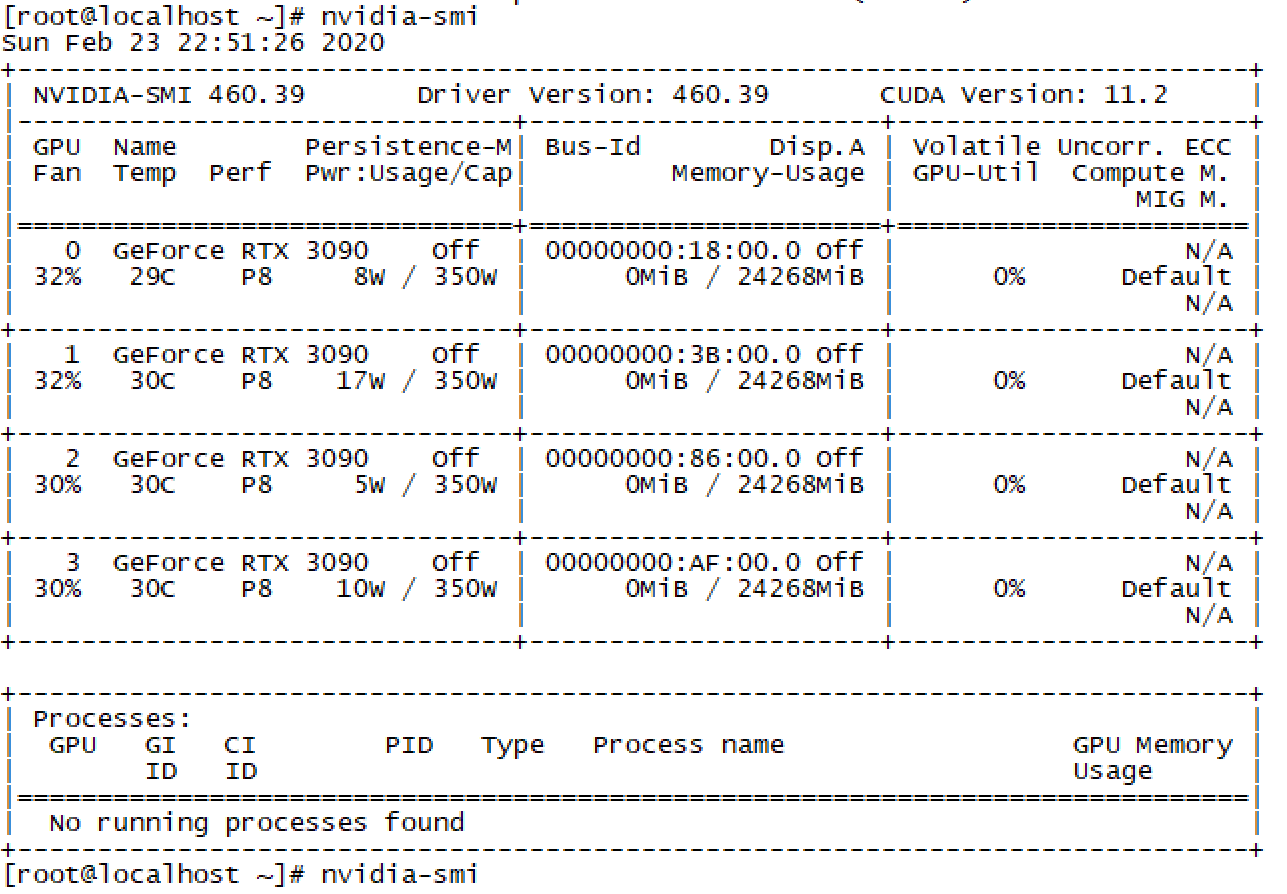
Fan:显示风扇转速,数值在0到100%之间,是计算机的期望转速,如果计算机不是通过风扇冷却或者风扇坏了,显示出来就是N/A;
Temp:显卡内部的温度,单位是摄氏度;
Perf:表征性能状态,从P0到P12,P0表示最大性能,P12表示状态最小性能;
Pwr:能耗表示;
Bus-Id:涉及GPU总线的相关信息;
Disp.A:是Display Active的意思,表示GPU的显示是否初始化;
Memory Usage:显存的使用率;
Volatile GPU-Util:浮动的GPU利用率;
Compute M:计算模式;
下边的Processes显示每块GPU上每个进程所使用的显存情况。
如果要周期性的输出显卡的使用情况,可以用watch指令实现:
watch -n 10 nvidia-smi
命令行参数-n后边跟的是执行命令的周期,以s为单位。
怎么用代码测试GPU呢,我用了两种方法,一种是java项目aparapi:
https://code.google.com/archive/p/aparapi/downloads
这个可以查看,用add这个sample测试gpu的可用性。
一种是用python,现在(2021-3)python已到了3.9,tensorflow是2。
我测试成功的环境是这样的。
1.centos7
2. 源码安装python3.7.10 https://www.python.org/downloads/release/python-3710/
解压后就三步./configure --with-ssl && make && make install
安装有可能需要yum -y install zlib*
安装完成后应该就有pip3命令
安装python有个坑,linux系统时间需要准确(不能小于python发布时间),否则make将无休止开进程,最后太多了想kill都不行。我遇到这个问题最后就只有重启电脑了。
3.pip3安装tensorflow
pip3 install --trusted-host pypi.org --trusted-host files.pythonhosted.org --trusted-host pypi.python.org tensorflow
4.测试,执行python3 test.py
test.py代码如下(注意缩进):
import tensorflow as tf

import timeit

with tf.device('/cpu:0'):

    cpu_a = tf.random.normal([10000, 1000])

    cpu_b = tf.random.normal([1000, 2000])

    print(cpu_a.device, cpu_b.device)

with tf.device('/gpu:0'):

    gpu_a = tf.random.normal([10000, 1000])

    gpu_b = tf.random.normal([1000, 2000])

    print(gpu_a.device, gpu_b.device)

def cpu_run():

    with tf.device('/cpu:0'):

        c = tf.matmul(cpu_a, cpu_b)

        return c

def gpu_run():

    with tf.device('/gpu:0'):

        c = tf.matmul(gpu_a, gpu_b)

        return c

# warm up

cpu_time = timeit.timeit(cpu_run, number=10)

gpu_time = timeit.timeit(gpu_run, number=10)

print('warmup:', cpu_time, gpu_time)

cpu_time = timeit.timeit(cpu_run, number=10)

gpu_time = timeit.timeit(gpu_run, number=10)

print('run time:', cpu_time, gpu_time)
pip3 install tensorflow目前默认安装的2.4.1,运行上面的代码问题很多,会报很多文件找不到,能正常运行结束,但速度很慢。服务器上要1秒多,而本地电脑不到1秒。
于是使用 pip3 install tensorflow-gpu==1.15 ,重新安装(先运行了pip3 uninstall tensorflow),再次运行上面代码,速度快了上百倍。但cpu与gpu速度差不多。
另一台机器装了另一软件环境(python3.6.13,tensorflow1.14.0)
有两篇文章对GPU与python的使用比较好,可参考:
https://blog.csdn.net/The_Time_Runner/article/details/103352235
https://www.freesion.com/article/7303420706/
python3安装好后,使用pip3 install numba可能会报错:
WARNING: pip is configured with locations that require TLS/SSL, however the ssl module in Python is not available.
WARNING: Retrying (Retry(total=4, connect=None, read=None, redirect=None, status=None)) after connection broken by 'SSLError("Can't connect to HTTPS URL because the SSL module is not available.")': /simple/pip/
WARNING: Retrying (Retry(total=3, connect=None, read=None, redirect=None, status=None)) after connection broken by 'SSLError("Can't connect to HTTPS URL because the SSL module is not available.")': /simple/pip/
WARNING: Retrying (Retry(total=2, connect=None, read=None, redirect=None, status=None)) after connection broken by 'SSLError("Can't connect to HTTPS URL because the SSL module is not available.")': /simple/pip/
WARNING: Retrying (Retry(total=1, connect=None, read=None, redirect=None, status=None)) after connection broken by 'SSLError("Can't connect to HTTPS URL because the SSL module is not available.")': /simple/pip/
WARNING: Retrying (Retry(total=0, connect=None, read=None, redirect=None, status=None)) after connection broken by 'SSLError("Can't connect to HTTPS URL because the SSL module is not available.")': /simple/pip/
Could not fetch URL https://pypi.org/simple/pip/: There was a problem confirming the ssl certificate: HTTPSConnectionPool(host='pypi.org', port=443): Max retries exceeded with url: /simple/pip/ (Caused by SSLError("Can't connect to HTTPS URL because the SSL module is not available.")) - skipping
Requirement already up-to-date: pip in /usr/local/lib/python3.7/site-packages (20.1.1)
WARNING: pip is configured with locations that require TLS/SSL, however the ssl module in Python is not available.
Could not fetch URL https://pypi.org/simple/pip/: There was a problem confirming the ssl certificate: HTTPSConnectionPool(host='pypi.org', port=443): Max retries exceeded with url: /simple/pip/ (Caused by SSLError("Can't connect to HTTPS URL because the SSL module is not available.")) - skipping查了很多资料,有的说安装时加--with-ssl,有的说改Setup源码,有的说安装这两:yum install openssl
yum install openssl-devel
还有的说加这些参数:
pip3 install --trusted-host pypi.org --trusted-host files.pythonhosted.org --trusted-host pypi.python.org numba
都不行。
还有尝试源码安装https://www.openssl.org/source/old/1.1.1/openssl-1.1.1i.tar.gz
最后我发现,我的机器上有pip3.6 也有 pip3.7 ,而pip3.6没有更新,那么使用以下命令更新一下就可以运行pip3 install numba了
pip3.6 install --upgrade pip
后面还是发现有些问题,pip3.7 install numba还是不行。而且查看pip3版本是这么个情况
[root@localhost test]# pip3 -V
pip 21.0.1 from /usr/local/lib/python3.6/site-packages/pip (python 3.6)
也就是说pip3用的python3.6 ,这导致一个结果python3.6 numba.xx.py可以成功,而python3.7 numba.xx.py不行。
为了使pip3.7 install numba不报ssl的错误,我重新编译了3.7的源码,加上ssl的参数就可以了。
./configure --with-openssl=/usr/local/openssl && make && make install
首先执行/usr/local/openssl version看看是不是上面说的openssl-1.1.1i的版本(较新,不一定非是这个)。